🧭 Automatic Navigation Indicator
Show automatic navigation indications like left / right turn indicator, U-turn indicator using your Android phone. Along with that, we can manually display some more indications like no overtake , allow overtake etc. using the buttons on our android app.
Note: App reads notification data to have automatic indicator light. Rest assured that, our app does not collect & send any data to anywhere. Enjoy the privacy & freedom (open-source).
📽️ Demo
You can play below Video or click this
Youtube Link
to see the demo. Please let me know in the comments, how do you feel about this App.
💰 Sponsor Me
You can buy me a coffee via
this link
or tap on below image. Thank you 🙏.

💡 How it works
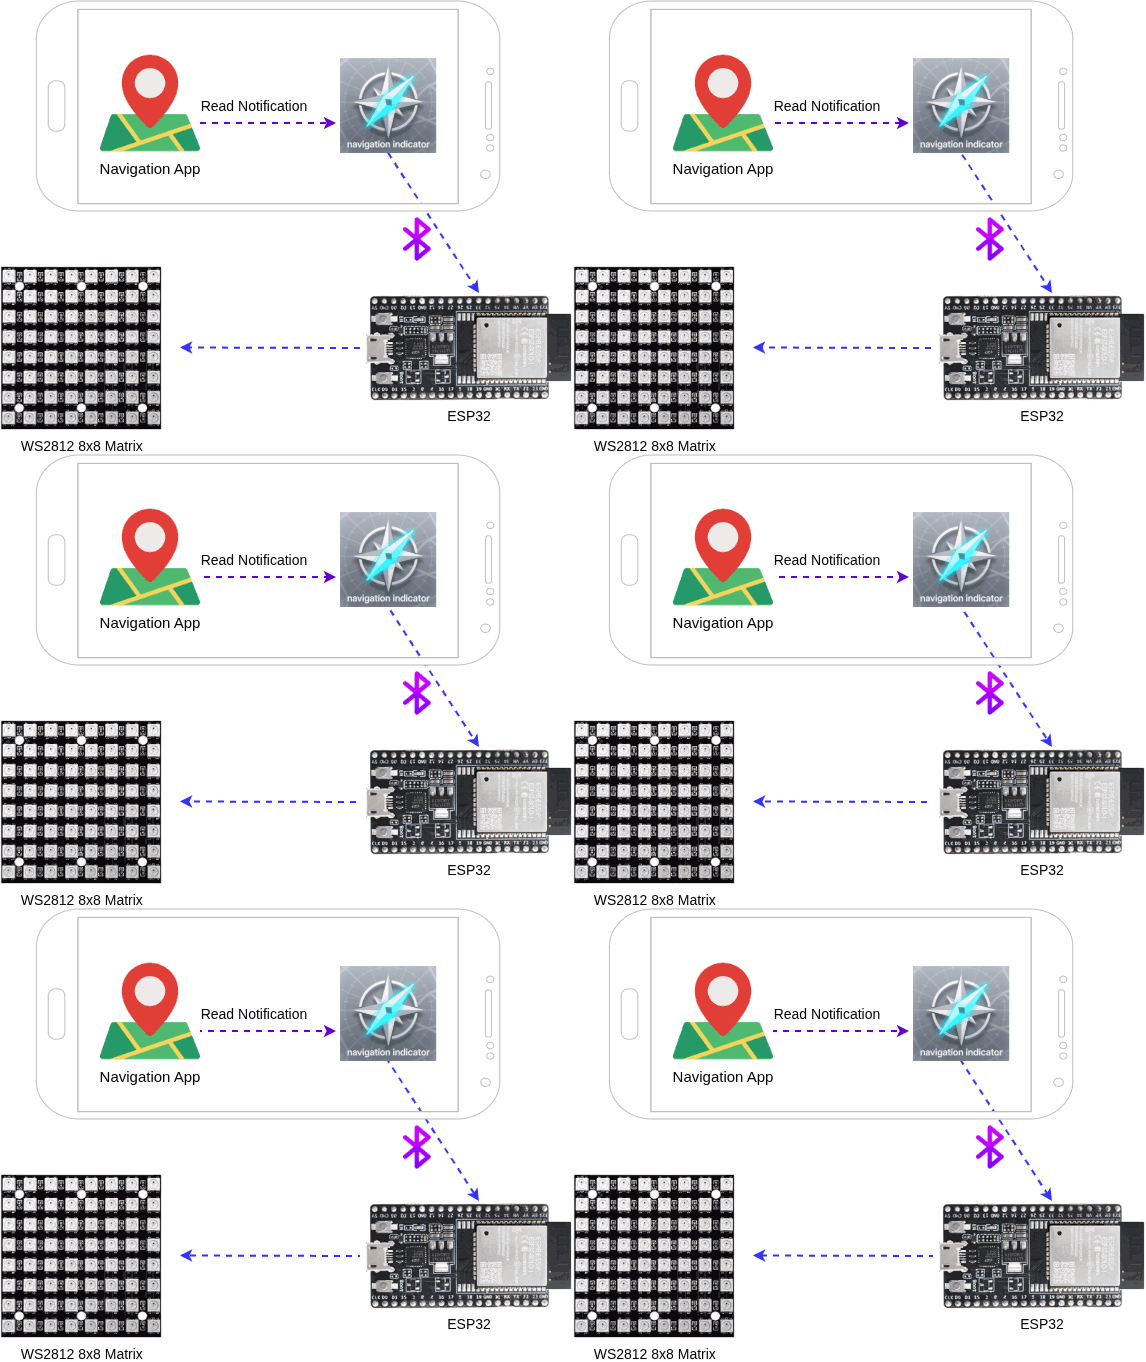
The flow in simple words:
-
We are capturing the navigation notification from a navigation app like Google-Maps or OsmAnd .
-
Our
dlNavapp processes the data & sends indicator signals toESP32microcontroller to display that on aWS2812B8x8 LED Matrix. -
The app also has all manual controls to display the indicator symbols.
🧑💻 Quickstart Guide
Follow this Quick Guide to setup your DIY navigation indicator (automatic or manual).
</> GitHub Link
You may checkout the code & other technical details in our GitHub Repo
🦾 ESP32 Setup
We can leverage
BLE
(low energy, recommended) or
Classic Bluetooth
(deprecated) to communicate from android device to ESP32 depending on the chosen model.
📦 Arduino Setup
If you want to learn about setting up your ESP32 environment in
Arduino IDE
, you may follow this
fantastic guide
.
-
Required Libraries: FastLED, LittleFS. Install the libraries.
-
Connect your ESP32 board to your computer with a USB cable.
-
Select proper ESP32 board type from
Tools>Boardsselection. -
Select your USB Serial port in
Tools>Port.
𓀨 ESP32 WROOM (Hardware Option 1)
This our classic ESP32 development board which might have 30 or 38 pins. This board supports both classic bluetooth & BLE. ESP32 board type in Arduino IDE is
ESP32 Dev Module
.
🪫 Required Products
Here is a list of products with purchase link(s). If something is marked as
Optional
means that is not required when we take power from vehicle battery*.
| Product | Purchase Link | Required | Remarks |
|---|---|---|---|
| ESP32 Board | https://amzn.to/4lhRTwV | YES | |
| WS2812 LED Matrix | https://amzn.to/4cEYqQ7 | YES | |
| SX1308 Boost Converter | https://amzn.to/4sw67wz | YES/Optional | YES: if power is from 3.7v battery |
| TP4056 Charging Module | https://amzn.to/4rZLU2h | YES/Optional | YES: if power is from 3.7v battery |
| 18650 Lithium Battery (3.7v) | https://amzn.to/3N98k2c | YES/Optional | YES: if power is not from vehicle |
| DC Step-down (buck) converter | https://amzn.to/4b6fQ5C | Optional | If you want to power it up from vehicle battery |
| DC on/off switch combopack | https://amzn.to/4s3mW2h | YES | Use as per your choice |
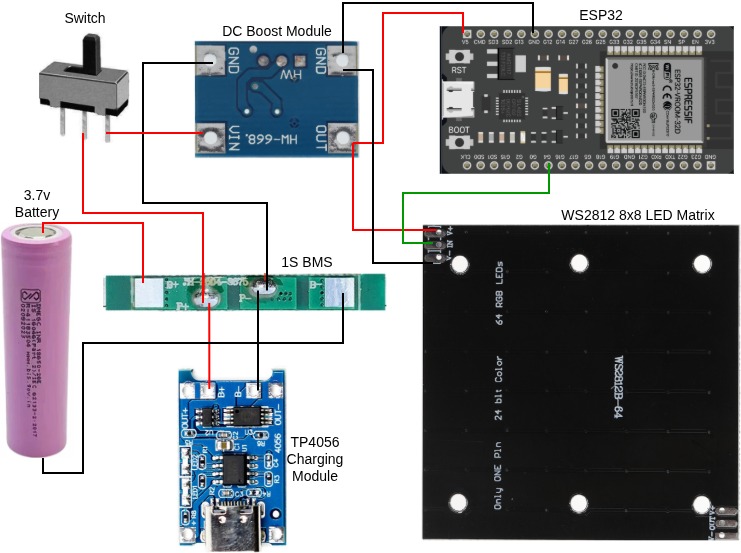
🖧 Connection Diagram
All you need is to connect the
GPIO-4
of
ESP32
with the
IN
port of the
WS2812 LED Matrix
and rest all are power connections.
ᛒ Bluetooth Low Energy (BLE)
For BLE upload this sketch using Arduino IDE.
ᛒ Classic Bluetooth (Deprecated)
For classic bluetooth upload this sketch using Arduino IDE.
📱 Automatic Indicator using the Android App (Can work independently)
-
Download the latest apk and install.
-
Open the app & grant necessary permissions as prompted. If you want to use this in
Auto Mode, you need to grantNotification readpermission for ourdlNavapp fromSetting>Apps>Special app access. -
Turn on bluetooth & pair
NavIndiESP(which is from the ESP32) device from phone settings or notification panel. -
Use the app to list all paired devices, choose the same bluetooth name & connect it from the app. Then proceed. You may manually enter the
MACaddress of your ESP too. -
Voila, you have now got the complete manual control of your DIY indicator device. You can press any switch to turn on/off the indicators.
-
Our app can read
Notificationsfrom apps likeGoogle Maps,OsmAnd,Offline Map Navigationfrom VirtualMaze and show the automatic indicator lights. Just start theAuto Mode. (Notification read permission needed). -
To use the automatic indicator controls from
MacroDroidorTermux, click onStart Server& proceed with next steps as below. (Then our app doesn't need notification or location access)
Note: Android Play Protect may block this app as it requires the special permission (notification read). You can temporarily turn OFF
Play ProtectfromPlaystore Settings> Then install our app > Again you can turn on the Play Protect (it will scan our app as safe). If you do not wish to proceed, you can download the older version0.0.3which works with Macrodroid or Termux as shown below (our app doesn't read notification). Rest assured, we do not collect any data from our app and the app code is open-source.
🧠 Automatic Navigation via Termux or Macrodroid (Deprecated)
You can choose either the macrodroid or termux way. Which will read the notifications from your navigation app & trigger an API (local) call to our android app.
🤖 Macrodroid way
This app is now technically a paid app (7 days trial or increase the days by viewing Ads). If you are a nerd, you may follow the Termux way.
-
Install Macrodroid App from playstore. Grant necessary permissions. Also you need to grant
Notification readpermissions from Settings > Apps > Special app access > Notification read > allow for Macrodroid. -
Then you can import this macro & enable it. Now you are all set for automatic indicators as per navigation.
>_ Termux way
You need to follow this termux guide which will start the automatic notification reading & calling the api of our app.
Note: The navigation app may have some delay in showing the notifications (app may show the correct navigation) which will also delay in indictor changes.
(Optional) API Docs (for sending navigation data using API)
Once you click
Start Server
on our app, it starts
FastAPI
server & the details would be available on below URI. Just enter the URL in phone's browser and you will also get an option to try the api directly from browser.
🤝 Contributing to this project
I would really love to get more contributors on this project.
I know many improvements can be done & also limitations can be minimized.